• Home
  • Bio
  • Contact
  • Testimonials
  • Photo Journal
    • Forrester Kustoms "The Brave" - 2012
    • '63 Fender Stratocaster Headstock Restoration
    • Rickenbacker 4001 Bass Resto Mod
    • Pavel Bass Headstock Repair
    • Martin 12-string Headstock Repair
    • 1962 Fender Bass VI Restoration
    • Red Hamer 'Vector' Flying Vee
    • Telecaster Thinline
    • Gibson Les Paul Goldtop Refinish
    • 1956 Fender Stratocaster Refret
    • 59 Les Paul R.I. Headstock Repair1
    • Les Paul Classic Inlay Swap
    • Custom Mahogany Archtop Armrest
    • 1967 Rickenbacker 4001S Restoration
    • Collings Acoustic Headstock Repair
    • Gibson LG0 Acoustic Bridge Replacement
    • Dean Camo Vee
    • '62 Reissue Fender Strat Relic Job
    • Custom Tele
  • Products & Services
  • Guestbook

Mike Forrester • Luthier

  • Home
  • Bio
  • Contact
  • Testimonials
  • Photo Journal
    • Forrester Kustoms "The Brave" - 2012
    • '63 Fender Stratocaster Headstock Restoration
    • Rickenbacker 4001 Bass Resto Mod
    • Pavel Bass Headstock Repair
    • Martin 12-string Headstock Repair
    • 1962 Fender Bass VI Restoration
    • Red Hamer 'Vector' Flying Vee
    • Telecaster Thinline
    • Gibson Les Paul Goldtop Refinish
    • 1956 Fender Stratocaster Refret
    • 59 Les Paul R.I. Headstock Repair1
    • Les Paul Classic Inlay Swap
    • Custom Mahogany Archtop Armrest
    • 1967 Rickenbacker 4001S Restoration
    • Collings Acoustic Headstock Repair
    • Gibson LG0 Acoustic Bridge Replacement
    • Dean Camo Vee
    • '62 Reissue Fender Strat Relic Job
    • Custom Tele
  • Products & Services
  • Guestbook
Yet another disfigured vintage Fender Instrument.  This time it's a 1962 Bass VI...

Yet another disfigured vintage Fender Instrument. This time it's a 1962 Bass VI...

The headstock had been modified from the original 6-in-line tuner arrangement, to a 3-per-side type headstock, complete with added wood, which was removed before I received the neck in for repair....

The headstock had been modified from the original 6-in-line tuner arrangement, to a 3-per-side type headstock, complete with added wood, which was removed before I received the neck in for repair....

New maple is being added to the headstock so that the original shape can be restored.....

New maple is being added to the headstock so that the original shape can be restored.....

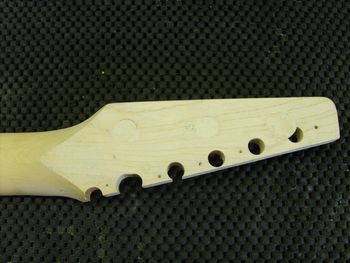
The neck had to be shaved even further in order for the new maple to fit in the proper orientation.  Most of the new wood will be removed as the Bass VI headstock is shaped....

The neck had to be shaved even further in order for the new maple to fit in the proper orientation. Most of the new wood will be removed as the Bass VI headstock is shaped....

As you can see from this side, things are already starting to take shape....

As you can see from this side, things are already starting to take shape....

Everything is glued and clamped, and left to cure for 24 hours....

Everything is glued and clamped, and left to cure for 24 hours....

Multiple pieces of maple are grain-aligned and glued to form an oversized headstock blank....

Multiple pieces of maple are grain-aligned and glued to form an oversized headstock blank....

The maple veneers will serve to camouflage and further reinforce the headstock....

The maple veneers will serve to camouflage and further reinforce the headstock....

Again, the pieces are glued, clamped, and left to cure.....

Again, the pieces are glued, clamped, and left to cure.....

Now things are really starting to take shape.  From here on, it's basic woodworking 101......UNTIL we get to the finish stage....

Now things are really starting to take shape. From here on, it's basic woodworking 101......UNTIL we get to the finish stage....

The Bass VI headstock shape has been restored.......

The Bass VI headstock shape has been restored.......

Just about ready for finish.....

Just about ready for finish.....

The overall headstock thickness is profiled down to the proper dimensions....

The overall headstock thickness is profiled down to the proper dimensions....

The old frets have been pulled, and the board is being prepped for new frets.....

The old frets have been pulled, and the board is being prepped for new frets.....

The new frets are in and roughly shaped.  I'll perform the final fret dress later.....

The new frets are in and roughly shaped. I'll perform the final fret dress later.....

Here, I have sprayed a couple of coats of tinted lacquer, which will serve as the base for my faux graining/camouflage....

Here, I have sprayed a couple of coats of tinted lacquer, which will serve as the base for my faux graining/camouflage....

After the tinted basecoat, I apply a darker stipple pattern to suggest pores in the wood....

After the tinted basecoat, I apply a darker stipple pattern to suggest pores in the wood....

Here, you can see where I've began to paint the maple grain over top of the tinted basecoat....

Here, you can see where I've began to paint the maple grain over top of the tinted basecoat....

The intitial graining is finished, and a coat of lacquer has been sprayed to seal everything I've done so far...

The intitial graining is finished, and a coat of lacquer has been sprayed to seal everything I've done so far...

The transition between real grain and faux grain....

The transition between real grain and faux grain....

Painted grain at the edge....

Painted grain at the edge....

Now, on to the body refinish....

Now, on to the body refinish....

First, white lacquer primer is sprayed.....

First, white lacquer primer is sprayed.....

The face of the headstock is sprayed Inca Silver to match the body...

The face of the headstock is sprayed Inca Silver to match the body...

Initial clear coats...

Initial clear coats...

The Inca Silver basecoats have been sprayed....

The Inca Silver basecoats have been sprayed....

Clear coats have cured, and the parts are ready for sanding and buffing....

Clear coats have cured, and the parts are ready for sanding and buffing....

Preparing to sand and buff....

Preparing to sand and buff....

The frets have been dressed and are ready to play....

The frets have been dressed and are ready to play....

The Bass VI body after buffing.....

The Bass VI body after buffing.....

The Inca Silver turned out beautiful....

The Inca Silver turned out beautiful....

Ready to ship to Chicago where the owner will reassemble the instrument....

Ready to ship to Chicago where the owner will reassemble the instrument....

The buffed lacquer really glows....

The buffed lacquer really glows....

The neck after buffing....

The neck after buffing....

One final shot of the transition area, where the real maple grain meets my faux grain....

One final shot of the transition area, where the real maple grain meets my faux grain....

The headstock is no longer an eyesore....

The headstock is no longer an eyesore....

Buffed and ready to ship....

Buffed and ready to ship....

The customer will be excited to get his Bass VI back...RESTORED to its former glory....

The customer will be excited to get his Bass VI back...RESTORED to its former glory....

Share photo gallery
  • Log out