

You're looking at the snot green inlays in a late model Gibson Les Paul Classic. It's very obvious, Gibson didn't quite nail that vintage look with these.

These new inlays are from Historic Makeovers, and better represent the look of the '50's Les Paul inlays.

First step - drill and drip some acetone in to loosen the old inlay.

The old inlays are out, and the cavities are prepared for the new ones.
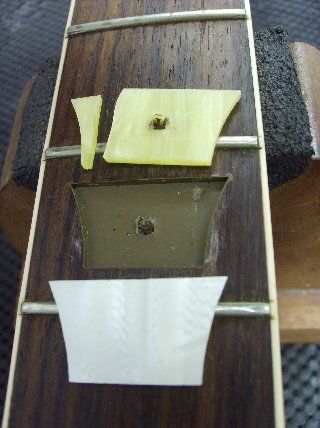
While the new inlays closely match the outlines of the old ones, some minor reshaping of the inlay and cavity is necessary.

This inlay is ready to glue in. The cavities are prepped.

2-part epoxy is tinted with pigment to closely match the color of the rosewood fretboard. Experience has taught me how to mix the color just right.

Here, the epoxy is setting up. Next, I will carefully level each and every inlay so that the transition between fretboard and inlay is seamless to the touch.

The inlays have been leveled, and the fretboard and inlays have been polished back to a beautiful luster. The black marker on the frets indicates that they are about to receive a leveling and dress.

After a final polish of the frets, fresh strings will go on, and this Les Paul Classic is looking truly 'classic'.

If you look closely, you'll see Gibson's filler around some of the inlay cavities, visible as an olive drab shade of green (why??). My filler is chocolate brown like the rosewood, and minimal.

Justin gives his newly transformed and back-dated Les Paul a test run. There's no denying, the guitar looks a million times better sans the ugly green inlays.